OpenStack ARCHITECTURE overview – 2013
2014 in review – Thanks WordPress
The WordPress.com stats helper monkeys prepared a 2014 annual report for this blog.

Here’s an excerpt:
The concert hall at the Sydney Opera House holds 2,700 people. This blog was viewed about 12,000 times in 2014. If it were a concert at Sydney Opera House, it would take about 4 sold-out performances for that many people to see it.
Solaris: nicstat Command Show Network Interface Card Statics
The “nicstat” command it application to monitor Network Traffic and give you more static regarding traffic in Kilobytes per second, Average Packet Traffic Size, Packet Send and Received,
– You Can Download Directly from Sourcforge.net Project as link below with “wget” command
# wget http://nchc.dl.sourceforge.net/project/nicstat/nicstat-1.92.tar.gz
– Extract tar file
# tar xvf nicstat-1.92.tar.gz
# cd nicstat-1.92
# ls -l
total 212
-rw-r--r--   1 509833   staff       4952 Oct 22  2012 ChangeLog.txt
-rwxr-xr-x   1 509833   staff        475 Oct 16  2012 dladm.sh
-rw-r--r--   1 509833   staff       1312 Oct 18  2012 enicstat
-rw-r--r--   1 509833   staff       8902 Oct 18  2012 LICENSE.txt
-rw-r--r--   1 509833   staff       1629 Sep  5  2012 Makefile.Linux
-rw-r--r--   1 509833   staff       1596 Oct 18  2012 Makefile.Solaris
-rw-r--r--   1 509833   staff       9423 Oct 22  2012 nicstat.1
-rw-r--r--   1 509833   staff      67376 Oct 22  2012 nicstat.c
-rwxr-xr-x   1 509833   staff       4134 Oct 16  2012 nicstat.sh
-rw-r--r--   1 509833   staff        834 Oct 22  2012 README.txt
– Compile the nicstat.c by gcc and using command
# /usr/bin/gcc nicstat.c -o nicstat -lkstat -lgen -lsocket -lrt
– After Compile finish it will create executable file “nicstat” at Current Directory
– You can start using “nicstat” Directly from you current Path or set “PATH” in your home User by add Folder path to ~/.profile to export Line
– To have Extended Output you can using parameter with “nicstat” command
# nicstat -x
11:37:34      RdKB    WrKB   RdPkt   WrPkt   IErr  OErr  Coll  NoCP Defer  %Util
lo0           0.00    0.00    0.00    0.00   0.00  0.00  0.00  0.00  0.00   0.00
aggr0         0.01    0.00    0.01    0.00   0.00  0.00  0.00  0.00  0.00   0.00
– -s to have output for Read & Write Kilobytes per second
# nicstat -s
    Time      Int          rKB/s          wKB/s
11:38:19      lo0          0.000          0.000
11:38:19    aggr0          0.007          0.000
– To print Summary static and traffic for each 1 Second you can used “1” with “nicstat”
# nicstat 1
    Time      Int   rKB/s   wKB/s   rPk/s   wPk/s    rAvs    wAvs %Util    Sat
11:40:37      lo0    0.00    0.00    0.00    0.00    0.00    0.00  0.00   0.00
11:40:37    aggr0    0.01    0.00    0.01    0.00   537.9   97.96  0.00   0.00
    Time      Int   rKB/s   wKB/s   rPk/s   wPk/s    rAvs    wAvs %Util    Sat
11:40:38      lo0    0.00    0.00    0.00    0.00    0.00    0.00  0.00   0.00
11:40:38    aggr0    0.30    0.35    5.00    1.00   61.20   354.0  0.00   0.00
    Time      Int   rKB/s   wKB/s   rPk/s   wPk/s    rAvs    wAvs %Util    Sat
11:40:39      lo0    0.00    0.00    0.00    0.00    0.00    0.00  0.00   0.00
11:40:39    aggr0    0.30    0.39    5.00    2.00   61.20   198.0  0.00   0.00
– To have Output static in every 2 Second for 3 times use “nicstat 2 3”
# nicstat 2 3
    Time      Int   rKB/s   wKB/s   rPk/s   wPk/s    rAvs    wAvs %Util    Sat
11:42:22      lo0    0.00    0.00    0.00    0.00    0.00    0.00  0.00   0.00
11:42:22    aggr0    0.01    0.00    0.01    0.00   537.9   97.96  0.00   0.00
    Time      Int   rKB/s   wKB/s   rPk/s   wPk/s    rAvs    wAvs %Util    Sat
11:42:24      lo0    0.00    0.00    0.00    0.00    0.00    0.00  0.00   0.00
11:42:24    aggr0    2.56    0.17   28.50    0.50   91.89   354.0  0.00   0.00
    Time      Int   rKB/s   wKB/s   rPk/s   wPk/s    rAvs    wAvs %Util    Sat
11:42:26      lo0    0.00    0.00    0.00    0.00    0.00    0.00  0.00   0.00
11:42:26    aggr0    1.15    0.17   12.50    0.50   94.48   354.0  0.00   0.00
OracleSolaris 11 – Image Packaging System Main Command (IPS)
IPS Summary
The Post Below Explain the Image Package System in Oracle Solaris 11, And How we can install, Uninstall, Check Package content, and Check Package Dependency
Oracle Solaris 11 Package have name structure it caled FMRI
FMRI: pkg://solaris/diagnostic/nmap@6.25,5.11-0.175.2.0.0.42.1:20140623T013013Z

Some IPS Commands for Installation and Uninstall
– List all Package in installed

– Full Info and Details for Package

– Package Contents for Nmap Package – sample Output

– Check All Package history

– To Checking the all package Integrity for Nmap Package

– To verify Package Dependency

– To Install Package at Oracle Solaris 11

– The Command to Uninstall any Package from your OS

– Solaris accept to check repository if there is any Update for any Package by Command

– Check Update for Specific Installed Package

– List All Publisher Configured in System and details

– I’m Already Configure Local Publisher and command below it will list all Packages

– To List more info for Local Publisher

– More Details for our Publisher and Local Repository

– To update you local Repo and update all package with new Version after Download last iso from Oracle Solaris

ORACLE Solaris – OpenStack

Basic Puppet Installation at Solaris 11.2
Review and Install Puppet at Solaris 11.2 it is useful in practice to understand how Puppet work at Solaris to manage multiple system and distributed configuration from Central System
Our Example to install Puppet at Global Zone and 2 Non-Global Zone and test /etc/hosts between Puppet Server master with Puppet Client agent, this Tutorial it assume you have Global Zone ‘master’ and 2 Non-Global Zone ‘agent1, agent2’
Preparation
I’m already prepare /etc/hosts file at our puppet server ‘master’ and clients ‘agent1, agent2’ The /etc/hosts of all zones (either global and Non-global zone) is now like this below
root@agent1:~# cat /etc/hosts
#
# Copyright 2009 Sun Microsystems, Inc.  All rights reserved.
# Use is subject to license terms.
#
# Internet host table
#
::1             localhost
127.0.0.1       localhost loghost
192.168.1.100    master.puppet.local.net master kusanagi
192.168.1.101   agent1.puppet.local.net agent1
192.168.1.102   agent2.puppet.local.net agent2
And all host name for all OS
root@master:~# hostname master.puppet.local.net
root@agent1:~# hostname agent1.puppet.local.net
root@agent2:~# hostname agent2.puppet.local.net
Installing and Configuring Puppet
To Start Puppet installation it is quite easy just like to install Regular Solaris pkg from Repository ‘pkg install puppet’ and this should be apply at all OS we have it to complete our practice then prepare Puppet server and enable from Solaris SMF to enable
root@master:~# pkg install puppet
root@master:/etc/puppet/ssl# svccfg -s puppet:master setprop config/server = master.puppet.local.net
root@master:/etc/puppet/ssl#  svccfg -s puppet:master refresh
root@master:/etc/puppet/ssl# svcadm enable puppet:master
root@master:/etc/puppet/manifests# svcs puppet
STATE          STIME    FMRI
disabled       Mai_19   svc:/application/puppet:agent
online         Mai_19   svc:/application/puppet:master
Prepare Agent to have testing connectivity between our Agent and Master
root@agent1:# puppet agent --test --server master.puppet.local.net
Info: Creating a new SSL key for agent1.puppet.local.net
Info: Caching certificate for ca
Info: csr_attributes file loading from /etc/puppet/csr_attributes.yaml
Info: Creating a new SSL certificate request for agent1.puppet.local.net
Info: Certificate Request fingerprint (SHA256): 14:20:1E:C8:D8:78:1D:DF:9C:92:75:F2:72:C6:61:61:AC:56:82:06:FC:A4:6D:5E:DA:5F:7E:12:80:5B:90:A9
Info: Caching certificate for ca
Exiting; no certificate found and waitforcert is disabled
root@agent1:~#
The Connection between the agent and the master is protect by SSL, at the first execution the agent creates a key and certificate request, and We have to repeat this command in another client
root@agent2:~# puppet agent --test --server master.puppet.local.net
Info: Creating a new SSL key for agent2.puppet.local.net
Info: Caching certificate for ca
Info: csr_attributes file loading from /etc/puppet/csr_attributes.yaml
Info: Creating a new SSL certificate request for agent2.puppet.local.net
Info: Certificate Request fingerprint (SHA256): 76:A7:23:A7:4D:41:66:DD:71:B0:4E:AA:62:EC:0B:DB:61:59:BE:56:43:15:E7:BA:C3:CB:AF:D3:98:D3:30:18
Info: Caching certificate for ca
Exiting; no certificate found and waitforcert is disabled
root@agent2:~#
From Puppet Server ‘master’ we can check all certificate generated for each agent by command
root@master:/etc/puppet/ssl# puppet cert list
  "agent1.puppet.local.net" (SHA256) 28:20:1E:C8:D8:78:1D:DF:6G:92:75:F2:72:C6:61:61:AC:56:82:06:FC:A4:6D:5E:DA:5F:7E:12:80:5B:90:A9
  "agent2.puppet.local.net" (SHA256) 71:A7:23:A7:4D:41:66:SS:71:B0:4E:AA:62:EC:0B:DB:61:59:BE:56:43:15:E7:BA:C3:CB:AF:D3:98:D3:30:18
Now we have two request to sign, Lets sign them
root@master:/etc/puppet/ssl# puppet cert sign agent1.puppet.local.net
Notice: Signed certificate request for agent1.puppet.local.net
Notice: Removing file Puppet::SSL::CertificateRequest agent1.puppet.local.net at '/etc/puppet/ssl/ca/requests/
root@master:/etc/puppet/ssl# puppet cert sign agent2.puppet.local.net
Notice: Signed certificate request for agent2.puppet.local.net
Notice: Removing file Puppet::SSL::CertificateRequest agent2.puppet.local.net at '/etc/puppet/ssl/ca/requests/agent2.puppet.local.net.pem'
We can check each agent connectivity deferent output
Agent1
root@agent1:~# puppet agent --test --server=master.puppet.local.net
Info: Caching certificate for agent1.puppet.local.net
Info: Caching certificate_revocation_list for ca
Info: Caching certificate for agent1.puppet.local.net
Info: Retrieving plugin
Notice: /File[/var/lib/puppet/lib/puppet]/ensure: created
[...]
Info: Caching catalog for agent1.puppet.local.net
Info: Applying configuration version '1400520716'
Info: Creating state file /var/lib/puppet/state/state.yaml
Notice: Finished catalog run in 0.09 seconds
root@agent1:~# svccfg -s puppet:agent setprop config/server = master.puppet.local.net
root@agent1:~#  svccfg -s puppet:agent refresh
root@agent1:~# svcadm enable puppet:agent
Agent2
root@agent2:~# puppet agent --test --server master.puppet.local.net
Info: Caching certificate for agent2.puppet.local.net
Info: Caching certificate_revocation_list for ca
Info: Caching certificate for agent2.puppet.Local.net
Info: Retrieving plugin
Notice: /File[/var/lib/puppet/lib/puppet]/ensure: created
[...]
Info: Caching catalog for agent2.puppet.local.net
Info: Applying configuration version '1400520716'
Info: Creating state file /var/lib/puppet/state/state.yaml
Notice: Finished catalog run in 0.09 seconds
root@agent2:~# svccfg -s puppet:agent setprop config/server = master.puppet.local.net
root@agent2:~# svccfg -s puppet:agent refresh
root@agent2:~# svcadm enable puppet:agent
Connectivity Tested and Done between Agents and master, will do some easy and more important in System admin to configure /etc/hosts to create Puppet modeule called etchosts which delivers an /etc/hosts file and the file is at /etc/puppet/modules/etchosts/files, which can be accessed Puppet under the URL puppet://modules/etchosts/hosts.
I will go through each steps at Puppet master and Puppet agents to show you how we can configure it
root@master:~# mkdir /etc/puppet/modules/etchosts
root@master:~# mkdir /etc/puppet/modules/etchosts/files
root@master:~# mkdir /etc/puppet/modules/etchosts/manifests
root@master:~# cp /etc/hosts /etc/puppet/modules/etchosts/files/hosts
Now we will give some life to the module /etc/hosts
root@master:~# cat << EOT > /etc/puppet/modules/etchosts/manifests/init.pp
> class etchosts {
>         file { "/etc/hosts":
>                 source => 'puppet:///modules/etchosts/hosts',
>         }
> }
> EOT
Afterwards we creating a file just including the nodes definition file:
root@master:~# cat << EOT > /etc/puppet/manifests/sites.pp
> import 'nodes.pp'
> EOT
At last we define the behaviour for the “default” node:
root@master:~# cat << EOT > /etc/puppet/manifests/nodes.pp
import 'etchosts'

node 'default' {
 include etchosts
}
I’m just add a line to the /etc/puppet/modules/etchosts/files/hosts file.
echo "# Add Line to puppet" >> /etc/puppet/modules/etchosts/files/hosts
Okay, now log into one of the zones with an agent and check the current /etc/host
hosam@agent2:~$ cat /etc/hosts
[...]
192.168.1.102   agent2.puppet.local.net agent2
hosam@agent2:~$
At the moment there there isn’t the additional line in the file. You can now wait for 1800 seconds at maximum (because the agent checks every 1800 seconds if there is something to do by default) or you can force the check. Let’s force it.
root@agent2:~# puppet agent --test
Info: Retrieving plugin
Info: Caching catalog for agent2.puppet.local.net
Info: Applying configuration version '1400529373'
Notice: /Stage[main]/Etchosts/File[/etc/hosts]/content:
--- /etc/hosts  Tue May 20 08:10:32 2014
+++ /tmp/puppet-file20140520-8490-tfgwja        Tue May 20 08:10:02 2014
@@ -11,2 +11,3 @@
 192.168.1.102  agent2.puppet.local.net agent2
+# Add Line to puppet

Info: /Stage[main]/Etchosts/File[/etc/hosts]: Filebucketed /etc/hosts to puppet with sum 38f6c964aab77edb2ff938094f13e2d0
Notice: /Stage[main]/Etchosts/File[/etc/hosts]/content: content changed '{md5}38f6c964aab77edb2ff938094f13e2d0' to '{md5}49b07e8c62ed409a01216bf9a35ae7ae'
Notice: Finished catalog run in 0.60 seconds
Now let’s check the file again … et voila … you find the line you have added into the /etc/puppet/modules/etchosts/files/hosts in the /etc/hosts of you file.
root@agent2:~# cat /etc/hosts
[...]
192.168.1.101   agent1.puppet.local.net agent1
192.168.1.102   agent2.puppet.local.net agent2
# Add Line to puppet
within Cup of Coffee prepare all Update with Sync from Master to all Agents 😀 will Done
Linux performance observability tools diagram

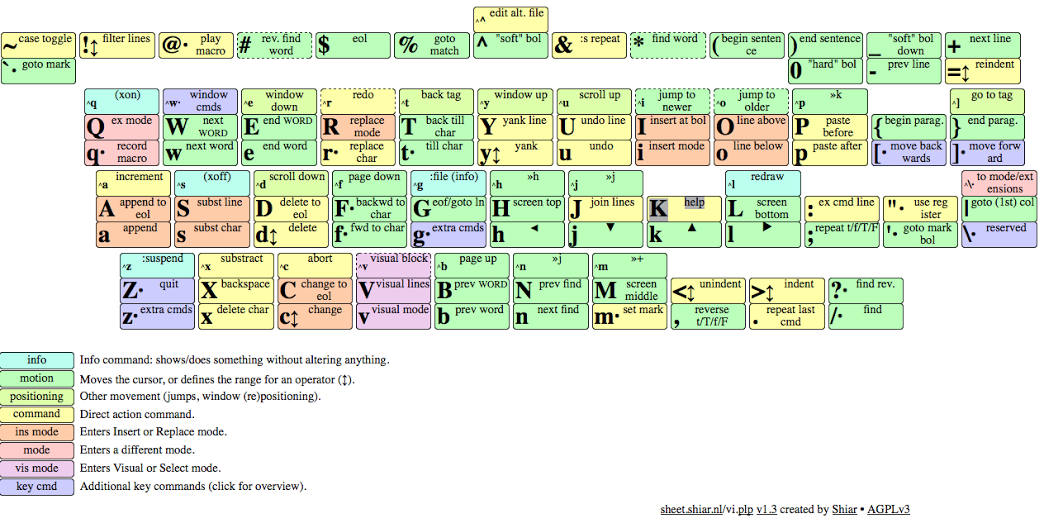
vi-vim visual cheat sheet
How to change Solaris Regulare User to have root Role
* Create Requlare User as Normal Solaris User
root@node2# useradd -c “Comment” -d /export/home/User_Name User_Name
root@node2# useradd -c “Regulare User with root Role” -d /export/home/Support Support
-c Comment
-d User Home Directory
– User_Name
* Assign Password for User Support with Specifies the repository to which an operation is
applied. The supported repositories are files, ldap, or nis.
root@node2:/# passwd -r files Support
New Password:
Re-enter new Password:
passwd: password successfully changed for Support
* Assign the root Role to User Account (Support)
root@node2:/# usermod -R root Support
* Login by New User (Support)
bash-4.1$ whoami
Support
bash-4.1$ roles
root
